This post shows how to configure Terraform’s OpenID Connect (OIDC) authentication from GitLab CI to Azure, for both
the azurerm provider
and the azurerm backend,
which until recently was blocked by a known issue. The issue
was fixed in this PR and released in
v1.3.4
.
The following step-by-step instructions and code examples can be found in my terraform-oidc-azure-gitlab repo.
If you want to create all required resources in one go, ensure you have the Azure CLI installed, then follow the steps below:
./scripts/setup.sh
.GITLAB_PROJECT_PATH
)../scripts/setup.sh
.Alternatively, read through each section below to review each step.
# login
az login
# vars - update these with your own values
APP_REG_NAME='gitlab.com_oidc'
GITLAB_URL='https://gitlab.com'
GITLAB_PROJECT_PATH='<YOUR_GROUP_NAME>/<YOUR_PROJECT_NAME>'
GITLAB_PROJECT_BRANCH_NAME='main'
# create app reg / service principal
APP_CLIENT_ID=$(az ad app create --display-name "$APP_REG_NAME" --query appId --output tsv)
az ad sp create --id "$APP_CLIENT_ID" --query appId --output tsv
# create Azure AD federated identity credential
# subject examples: https://docs.gitlab.com/ee/ci/cloud_services/#configure-a-conditional-role-with-oidc-claims
APP_OBJECT_ID=$(az ad app show --id "$APP_CLIENT_ID" --query id --output tsv)
# example subject: project_path:ARTestGroup99/terraform-oidc-azure-gitlab:ref_type:branch:ref:main
cat <<EOF > cred_params.json
{
"name": "gitlab-federated-identity",
"issuer": "${GITLAB_URL}",
"subject": "project_path:${GITLAB_PROJECT_PATH}:ref_type:branch:ref:${GITLAB_PROJECT_BRANCH_NAME}",
"description": "GitLab federated credential for ${GITLAB_PROJECT_PATH}",
"audiences": [
"${GITLAB_URL}"
]
}
EOF
az ad app federated-credential create --id "$APP_OBJECT_ID" --parameters 'cred_params.json'
Run the code below to assign the Contributor
RBAC role to the Subscription:
SUBSCRIPTION_ID=$(az account show --query id --output tsv)
az role assignment create --role "Contributor" --assignee "$APP_CLIENT_ID" --scope "/subscriptions/$SUBSCRIPTION_ID"
Run the code below to create the Terraform storage and assign the Storage Blob Data Contributor
RBAC role to the
container:
# vars - update these with your own values
PREFIX='arshzgl'
LOCATION='eastus'
TERRAFORM_STORAGE_RG="${PREFIX}-rg-tfstate"
TERRAFORM_STORAGE_ACCOUNT="${PREFIX}sttfstate${LOCATION}"
TERRAFORM_STORAGE_CONTAINER="terraform"
# resource group
az group create --location "$LOCATION" --name "$TERRAFORM_STORAGE_RG"
# storage account
STORAGE_ID=$(az storage account create --name "$TERRAFORM_STORAGE_ACCOUNT" \
--resource-group "$TERRAFORM_STORAGE_RG" --location "$LOCATION" --sku "Standard_LRS" --query id --output tsv)
# storage container
az storage container create --name "$TERRAFORM_STORAGE_CONTAINER" --account-name "$TERRAFORM_STORAGE_ACCOUNT"
# define container scope
TERRAFORM_STORAGE_CONTAINER_SCOPE="$STORAGE_ID/blobServices/default/containers/$TERRAFORM_STORAGE_CONTAINER"
echo "$TERRAFORM_STORAGE_CONTAINER_SCOPE"
# assign rbac
az role assignment create --assignee "$APP_CLIENT_ID" --role "Storage Blob Data Contributor" \
--scope "$TERRAFORM_STORAGE_CONTAINER_SCOPE"
Create the following GitLab CI/CD variables in
https://gitlab.com/<GROUP_NAME>/<PROJECT_NAME>/-/settings/ci_cd
, using the code examples to show the required
values:
ARM_CLIENT_ID
# use existing variable from previous step
echo "$APP_CLIENT_ID"
# or use display name to get the app id
APP_CLIENT_ID=$(az ad app list --display-name "$APP_REG_NAME" --query [].appId --output tsv)
echo "$APP_CLIENT_ID"
ARM_SUBSCRIPTION_ID
az account show --query id --output tsv
ARM_TENANT_ID
az account show --query tenantId --output tsv
To enable OIDC authentication for the azurerm backend, apart from the standard
azurerm backend configuration,
you must ensure you use at least Terraform version 1.3.4
as shown in the example below:
terraform {
required_version = ">= 1.3.4"
backend "azurerm" {
key = "terraform.tfstate"
}
required_providers {
azurerm = {
source = "hashicorp/azurerm"
version = "~> 3.92.0"
}
}
}
Only the backend key
is defined above, as I use the -backend-config
options during terraform init
which
allows passing variables, eg:
terraform init \
-backend-config="resource_group_name=$TERRAFORM_STORAGE_RG" \
-backend-config="storage_account_name=$TERRAFORM_STORAGE_ACCOUNT" \
-backend-config="container_name=$TERRAFORM_STORAGE_CONTAINER"
To enable OIDC authentication for both the azurerm backend and standard azurerm provider, use the following
GitLab CI id_tokens
config and variables
below:
default:
id_tokens:
GITLAB_OIDC_TOKEN:
aud: https://gitlab.com
variables:
ARM_USE_OIDC: "true"
ARM_OIDC_TOKEN: $GITLAB_OIDC_TOKEN
To confirm OIDC authentication is being used, you can set the TF_LOG
env var to INFO
:
variables:
TF_LOG: "INFO"
Once all previous steps have been successfully completed, follow the steps below to run the terraform
pipeline:
https://gitlab.com/<YOUR_GROUP_NAME>/<YOUR_PROJECT_NAME>
Build > Pipelines
.Run pipeline
.ENABLE_TERRAFORM_DESTROY_MODE
variable value to true
to run Terraform Plan in “destroy mode”.Run pipeline
Run ./scripts/cleanup.sh
,
or use the code below to remove all created resources from this demo:
# login
az login
# vars - update these with your own values
APP_REG_NAME='gitlab.com_oidc'
PREFIX='arshzgl'
# remove role assignment
APP_CLIENT_ID=$(az ad app list --display-name "$APP_REG_NAME" --query [].appId --output tsv)
SUBSCRIPTION_ID=$(az account show --query id --output tsv)
az role assignment delete --role "Contributor" --assignee "$APP_CLIENT_ID" --scope "/subscriptions/$SUBSCRIPTION_ID"
# remove app reg
echo "Deleting app [$APP_REG_NAME] with App Client Id: [$APP_CLIENT_ID]..."
az ad app delete --id "$APP_CLIENT_ID"
# list then remove resource groups (prompts before deletion)
QUERY="[?starts_with(name,'$PREFIX')].name"
az group list --query "$QUERY" --output table
for resource_group in $(az group list --query "$QUERY" --output tsv); do echo "Delete Resource Group: ${resource_group}"; az group delete --name "${resource_group}"; done
When you deploy an AKS cluster with Azure portal, Azure CLI, Azure PowerShell, the cluster defaults to the N-1 minor version and latest patch. For example, if AKS supports 1.17.a, 1.17.b, 1.16.c, 1.16.d, 1.15.e, and 1.15.f, the default version selected is 1.16.c.
Even though there are ways to auto-upgrade existing AKS clusters I typically use Terraform to provision clusters, so I prefer to have more control over what version to use - and more importantly - when the upgrades occur.
Read on to see Bash and PowerShell examples for showing the default AKS version via the command-line.
# show all aks versions
az aks get-versions --location 'uksouth'
# show default aks version using a JMESPath query
# https://learn.microsoft.com/en-us/cli/azure/query-azure-cli?tabs=concepts%2Cbash
az aks get-versions --location 'uksouth' --output 'tsv' --query 'orchestrators | [?default].orchestratorVersion'
# show default aks version using jq
az aks get-versions --location 'uksouth' | jq -r '.orchestrators | .[] | select(.default==true) | .orchestratorVersion'
# show all aks versions
Get-AzAksVersion -location 'uksouth'
# show default aks version
(Get-AzAksVersion -location 'uksouth' | Where-Object default).OrchestratorVersion
# show default aks version using az cli
((az aks get-versions --location 'uksouth' | ConvertFrom-Json).orchestrators | Where-Object default).OrchestratorVersion
A quick tip on how to avoid backup deletion during Velero upgrades via Argo CD.
Initially when upgrading Velero with Argo CD, any backup objects created from a schedule would be pruned, as they
had no owner ref. Setting the schedule’s useOwnerReferencesInBackup
value to true
within the
Velero helm chart
fixed that specific problem.
However, on subsequent Velero upgrades where the schedule was affected, all backups would also be removed, due to
the useOwnerReferencesInBackup
setting.
The fix was to use Argo CD’s Resource Exclusion option, as shown below:
Edit the argocd-cm
configmap:
kubectl edit configmap argocd-cm --namespace argocd
Add exclusion block for velero backups:
data
resource.exclusions: |
- apiGroups:
- "velero.io"
kinds:
- Backup
clusters:
- "*"
Myself and several other Microsoft Engineers were recently struggling with intermittent AKS node issues. When the issue occurred, the node(s) would not allow new pods to be created, or any method of connecting a terminal session. In short, there was no method of collecting logs from these broken nodes.
The solution for log collection was to deploy AKS Periscope (before the issues occurred).
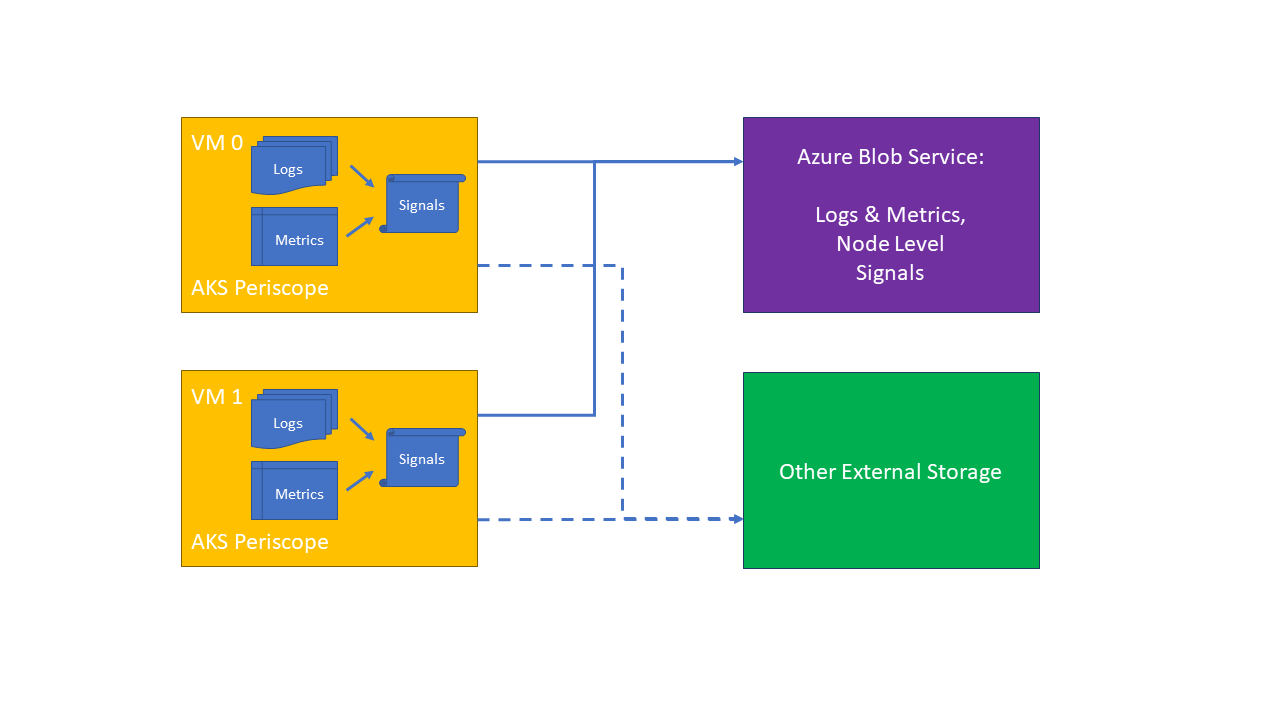
AKS Periscope deploys a daemonset into your cluster which will collect useful logs from each node, including:
Excerpt from the AKS Periscope repo:
Hopefully most of the time, your AKS cluster is running happily and healthy. However, when > things do go wrong, AKS customers need a tool to help them diagnose and collect the logs necessary to troubleshoot > the issue. It can be difficult to collect the appropriate node and pod logs to figure what’s wrong, how to fix > the problem, or even to pass on those logs to others to help.
AKS Periscope allows AKS customers to run initial diagnostics and collect and export the > logs (such as into an Azure Blob storage account) to help them analyze and identify potential problems or easily > share the information to support to help with the troubleshooting process with a simple
az aks kollect
command. > These cluster issues are often caused by incorrect cluster configuration, such as networking or permission issues. > This tool will allow AKS customers to run initial diagnostics and collect logs and custom analyses that helps them > identify the underlying problems.
I had issues using the az aks kollect
deployment method, so opted for the Kustomize Deployment
method, as this offered full customisation and greater control.
One additional requirement I had was for the AKS Periscope pods to run on system nodepools that had the CriticalAddonsOnly=true:NoSchedule
taint applied. By default, they wouldn’t start on the system nodepools, so I had to add a toleration to the Kustomize definition (shown below).
The deploy_aks_periscope.sh
script will do the following:
As the log collection only runs once, you will need to update DIAGNOSTIC_RUN_ID
to trigger subsequent log collections.
The update_aks_periscope.sh
script will do the following:
azureblob-secret
.I had to automate some AKS tasks, which could only continue when disks had detached from their nodes. The solution
should accept AKS cluster and PVC names, then wait for the disks to no longer show as Attached
, and also be
available in both PowerShell and Bash.
I needed a way to create all possible combinations from two lists. The first was a list of Azure AD Roles, and the second was a list of target Resource Groups where the AAD Roles should be assigned.
The solution was using Terraform’s built-in setproduct
function.
The setproduct function finds all of the possible combinations of elements from all of the given sets by computing the Cartesian product.
# Create all possible combinations from two lists, and loop through result to assign roles
# https://www.terraform.io/docs/language/functions/setproduct.html
provider "azurerm" {
features {}
}
terraform {
required_version = ">= 1.0"
required_providers {
azurerm = {
source = "hashicorp/azurerm"
version = "~> 3.20.0"
}
}
}
locals {
roles = [
"Storage Blob Data Owner",
"Key Vault Contributor",
]
scopes = [
"/subscriptions/SUB_NAME/resourceGroups/rg1",
"/subscriptions/SUB_NAME/resourceGroups/rg2",
]
role_scopes_product = setproduct(local.roles, local.scopes)
# Setproduct produces a structure like this for role_scopes_product:
# [
# [
# "Storage Blob Data Owner",
# "/subscriptions/SUB_NAME/resourceGroups/rg1",
# ],
# [
# "Storage Blob Data Owner",
# "/subscriptions/SUB_NAME/resourceGroups/rg2",
# ],
# [
# "Key Vault Contributor",
# "/subscriptions/SUB_NAME/resourceGroups/rg1",
# ],
# [
# "Key Vault Contributor",
# "/subscriptions/SUB_NAME/resourceGroups/rg2",
# ],
# ]
# Build a map from the above "list of lists", using a compound key of both list values, and the map value being the original list of the role and scope
role_scopes_map_of_lists = { for role_scope in local.role_scopes_product : "${role_scope[0]}-${role_scope[1]}" => role_scope }
# role_scopes_map_of_lists looks like this:
# {
# "Key Vault Contributor-/subscriptions/SUB_NAME/resourceGroups/rg1" = [
# "Key Vault Contributor",
# "/subscriptions/SUB_NAME/resourceGroups/rg1",
# ]
# "Key Vault Contributor-/subscriptions/SUB_NAME/resourceGroups/rg2" = [
# "Key Vault Contributor",
# "/subscriptions/SUB_NAME/resourceGroups/rg2",
# ]
# "Storage Blob Data Owner-/subscriptions/SUB_NAME/resourceGroups/rg1" = [
# "Storage Blob Data Owner",
# "/subscriptions/SUB_NAME/resourceGroups/rg1",
# ]
# "Storage Blob Data Owner-/subscriptions/SUB_NAME/resourceGroups/rg2" = [
# "Storage Blob Data Owner",
# "/subscriptions/SUB_NAME/resourceGroups/rg2",
# ]
# }
role_scopes_map_of_maps = {
for role_scope in local.role_scopes_product : "${role_scope[0]}-${role_scope[1]}" => {
"role_name" = role_scope[0],
"scope" = role_scope[1]
}
}
# role_scopes_map_of_maps looks like this:
# {
# "Key Vault Contributor-/subscriptions/SUB_NAME/resourceGroups/rg1" = {
# "role_name" = "Key Vault Contributor"
# "scope" = "/subscriptions/SUB_NAME/resourceGroups/rg1"
# }
# "Key Vault Contributor-/subscriptions/SUB_NAME/resourceGroups/rg2" = {
# "role_name" = "Key Vault Contributor"
# "scope" = "/subscriptions/SUB_NAME/resourceGroups/rg2"
# }
# "Storage Blob Data Owner-/subscriptions/SUB_NAME/resourceGroups/rg1" = {
# "role_name" = "Storage Blob Data Owner"
# "scope" = "/subscriptions/SUB_NAME/resourceGroups/rg1"
# }
# "Storage Blob Data Owner-/subscriptions/SUB_NAME/resourceGroups/rg2" = {
# "role_name" = "Storage Blob Data Owner"
# "scope" = "/subscriptions/SUB_NAME/resourceGroups/rg2"
# }
# }
}
# resource groups
resource "azurerm_resource_group" "rg1" {
name = "rg1"
location = "uksouth"
}
resource "azurerm_resource_group" "rg2" {
name = "rg2"
location = "uksouth"
}
data "azurerm_client_config" "current" {}
data "azuread_service_principal" "current" {
application_id = data.azurerm_client_config.current.client_id
}
# maps of lists loop example
resource "azurerm_role_assignment" "map_of_lists" {
for_each = local.role_scopes_map_of_lists
scope = each.value[1]
role_definition_name = each.value[0]
principal_id = "MY_USER_ID"
}
# maps of maps loop example
resource "azurerm_role_assignment" "map_of_maps" {
for_each = local.role_scopes_map_of_maps
scope = each.value.scope
role_definition_name = each.value.role_name
principal_id = data.azuread_service_principal.current.object_id
}
Save the code example to a local file, then run the commands below view the data structures etc:
# init
terraform init
# enter console
terraform console
# output locals to view data structures
# show all list variations
local.role_scopes_product
# show the map of lists
local.role_scopes_map_of_lists
# show the nested map
local.role_scopes_map_of_maps
# exit console
# show plan
terraform plan
GitLab CI/CD is a tool built into GitLab for software development through the continuous methodologies.
GitLab CI is configured via the .gitlab-ci.yml file, and the .gitlab-ci.yml reference documentation is excellent. The overall GitLab documentation is some of the best out there, however, not all use-cases for using GitLab CI are covered.
Whilst working on a Helm Chart pipeline, I wanted to bring together many of the testing steps I’ve used in other pipelines. This included validation, linting, and installing.
The problem was the Helm Chart test pipeline required a nested Kubernetes environment, as our self-hosted GitLab runs on Kubernetes. DinD (Docker in Docker) and KinD (Kubernetes in Docker) solved the nested requirement, but errors were occurring.
The solution was to configure a custom GitLab Runner with four volumes:
/certs/client
(secure TLS connection)/var/lib/docker
/lib/modules
/sys/fs/cgroup
The relevant GitLab Runner config is shown below:
runners:
config: |
[[runners]]
[runners.kubernetes]
image = "ubuntu:20.04"
privileged = true
[[runners.kubernetes.volumes.empty_dir]]
name = "docker-certs"
mount_path = "/certs/client"
medium = "Memory"
[[runners.kubernetes.volumes.empty_dir]]
name = "dind-storage"
mount_path = "/var/lib/docker"
[[runners.kubernetes.volumes.host_path]]
name = "hostpath-modules"
mount_path = "/lib/modules"
read_only = true
host_path = "/lib/modules"
[[runners.kubernetes.volumes.host_path]]
name = "hostpath-cgroup"
mount_path = "/sys/fs/cgroup"
host_path = "/sys/fs/cgroup"
tags: "dind"
I’ve uploaded the full helm chart values for Docker-in-Docker (DinD) config to support installing KinD nodes.
For more information, read the GitLab documentation on using volumes with the GitLab Runner’s Kubernetes executor.
With the custom GitLab Runner configured with the required four volumes, the following .gitlab-ci.yml
configuration was used for the Helm Chart pipeline (some code removed for brevity):
# Helm Chart Pipeline
image: <HELM_RELEASE_PIPELINE_IMAGE>
variables:
# When using dind service, we need to instruct docker to talk with
# the daemon started inside of the service. The daemon is available
# with a network connection instead of the default
# /var/run/docker.sock socket.
# port 2375 for no TLS connection (insecure)
# port 2376 for TLS connection
DOCKER_HOST: tcp://docker:2376
# Specify to Docker where to create the certificates, Docker will
# create them automatically on boot, and will create
# `/certs/client` that will be shared between the service and job
# container, thanks to volume mount from config.toml
DOCKER_TLS_CERTDIR: "/certs"
# These are usually specified by the entrypoint, however the
# Kubernetes executor doesn't run entrypoints
# https://gitlab.com/gitlab-org/gitlab-runner/-/issues/4125
DOCKER_TLS_VERIFY: 1
DOCKER_CERT_PATH: "$DOCKER_TLS_CERTDIR/client"
# Disable 'shallow clone'
GIT_DEPTH: 0
services:
# service image (eg: svc-0) - contains docker daemon (engine)
- docker:19.03.13-dind
# Use variables to decide what triggers the pipeline
# https://docs.gitlab.com/ee/ci/variables/predefined_variables.html
workflow:
rules:
# https://docs.gitlab.com/ee/ci/yaml/README.html#workflowrules
# Only trigger on a Merge Request
- if: '$CI_PIPELINE_SOURCE == "merge_request_event"'
# Allow manual trigger via the GUI
- if: '$CI_PIPELINE_SOURCE == "web"'
stages:
- validate
- lint
- install
validate:
tags:
- dind
stage: validate
parallel:
matrix:
- K8S_VERSION:
- 1.17.17
- 1.18.15
- 1.19.7
script:
- echo "this is the validate stage"
lint:
tags:
- dind
stage: lint
script:
- echo "this is the linting stage"
install:
before_script:
- echo "Waiting for docker cli to respond before continuing build..."
- |
for i in $(seq 1 30); do
if ! docker info &> /dev/null; then
echo "Docker not responding yet. Sleeping for 2s..." && sleep 2s
else
echo "Docker ready. Continuing build..."
break
fi
done
tags:
- dind
stage: install
parallel:
matrix:
- K8S_VERSION:
- 1.17.17
- 1.18.15
- 1.19.7
script:
- echo "this is the install stage that uses KinD, eg:"
- kind create cluster --name "ci-cluster${K8S_VERSION}" --image "kindest/node:v${K8S_VERSION}" --wait 5m
Note the install.before_script
that waits for docker to be responsive. Without that check, the install
job will
fail intermittently.
Last week I was tasked with increasing the size of some Persistent Volumes (PV) for one of the apps running on Azure Kubernetes Service (AKS). If possible, this task was to be completed without any downtime to the application.
I’d previously read about
resizing persistent volumes,
and knew about the allowVolumeExpansion
setting within a StorageClass
, so I was expecting this to be a breeze.
After following the standard method above, I found that the Azure Disks were not expanding, even after deleting and recreating the pods several times.
The reason was the AKS disk state was not changing to Unattached
.
I’ve noted the main steps for two solutions below, but you can see my
expand_k8s_pvc.sh gist for the full
code examples, which include installing an example application (rabbitmq
), and additional validation steps.
The first solution is the easiest, but requires downtime.
Use Helm to install a rabbitmq
cluster with 2
pods for testing:
helm upgrade rabbitmq bitnami/rabbitmq --install --atomic --namespace rabbitmq --set=replicaCount=2 --set=persistence.size=1Gi --debug
Backup the statefulset YAML - needed to recreate afterwards:
kubectl --namespace rabbitmq get statefulset rabbitmq --output yaml > rabbitmq-statefulset.yaml
rabbitmq-statefulset.yaml
with the new
volumeClaimTemplates.spec.resources.requests.storage
value (eg: from 1Gi
to 2Gi
).Scale down statefulset to 0
replicas, and wait until all AKS disk states show: Unattached
:
kubectl --namespace rabbitmq scale statefulset rabbitmq --replicas=0
Delete the StatefulSet but leave its pod(s):
kubectl --namespace rabbitmq delete statefulsets rabbitmq --cascade=false
Patch every PVC (spec.resources.requests.storage
) in the StatefulSet, to increase its capacity (eg: from 1Gi
to 2Gi
):
kubectl --namespace rabbitmq patch pvc data-rabbitmq-0 --patch '{\"spec\": {\"resources\": {\"requests\": {\"storage\": \"2Gi\"}}}}'
kubectl --namespace rabbitmq patch pvc data-rabbitmq-1 --patch '{\"spec\": {\"resources\": {\"requests\": {\"storage\": \"2Gi\"}}}}'
Recreate using the exported/amended YAML from earlier:
WARNING!: Ensure the exported rabbitmq-statefulset.yaml
now has the new
volumeClaimTemplates.spec.resources.requests.storage
value (eg: 2Gi
), else adding new replicas will still
use the old value of 1Gi
.
kubectl --namespace rabbitmq apply -f rabbitmq-statefulset.yaml
Validate the new disk size (2Gi
) within application container:
kubectl --namespace rabbitmq exec -it rabbitmq-0 -- df -h
The second solution has more steps, but requires no downtime.
Use Helm to install a rabbitmq
cluster with 3
pods for testing:
helm upgrade rabbitmq bitnami/rabbitmq --install --atomic --namespace rabbitmq --set=replicaCount=3 --set=persistence.size=1Gi --debug
Backup the statefulset YAML - needed to recreate afterwards:
kubectl --namespace rabbitmq get statefulset rabbitmq --output yaml > rabbitmq-statefulset.yaml
rabbitmq-statefulset.yaml
with the new
volumeClaimTemplates.spec.resources.requests.storage
value (eg: from 1Gi
to 2Gi
).Delete the StatefulSet but leave its pod(s):
kubectl --namespace rabbitmq delete statefulsets rabbitmq --cascade=false
Delete only first pod (second and third pods are still running), and wait until the first pod AKS disk state is Unattached
:
kubectl --namespace rabbitmq delete pod rabbitmq-0
Patch first pod PVC (spec.resources.requests.storage
) in the StatefulSet, to increase its capacity (eg: from 1Gi
to 2Gi
):
kubectl --namespace rabbitmq patch pvc data-rabbitmq-0 --patch '{\"spec\": {\"resources\": {\"requests\": {\"storage\": \"2Gi\"}}}}'
Recreate using the exported/amended YAML from earlier:
WARNING!: Ensure the exported rabbitmq-statefulset.yaml
now has the new
volumeClaimTemplates.spec.resources.requests.storage
value (eg: 2Gi
), else adding new replicas will still
use the old value of 1Gi
.
kubectl --namespace rabbitmq apply -f rabbitmq-statefulset.yaml
Scale down statefulset to 1
replica, so the second and third pod is terminated, and wait until the pods AKS disk states are Unattached
:
kubectl --namespace rabbitmq scale statefulset rabbitmq --replicas=1
Patch second and third PVCs (spec.resources.requests.storage
) in the StatefulSet, to increase its capacity (eg: from 1Gi
to 2Gi
):
kubectl --namespace rabbitmq patch pvc data-rabbitmq-1 --patch '{\"spec\": {\"resources\": {\"requests\": {\"storage\": \"2Gi\"}}}}'
kubectl --namespace rabbitmq patch pvc data-rabbitmq-2 --patch '{\"spec\": {\"resources\": {\"requests\": {\"storage\": \"2Gi\"}}}}'
Scale back to original replica amount, so the rabbitmq cluster can rebalance:
kubectl --namespace rabbitmq scale statefulset rabbitmq --replicas=3
Validate the new disk space used within application container:
kubectl --namespace rabbitmq exec -it rabbitmq-0 -- df -h
See my expand_k8s_pvc.sh gist for the full code examples.
]]>Popular DevOps tools like Packer and Ansible come with the ability to do interactive debugging, which is essential when troubleshooting issues quickly.
However, what happens when you’re running your CI pipelines on Kubernetes?
The problem with running your CI pipelines on Kubernetes is that tools like Packer and Ansible dont allow interactive debugging within containers using standard configuration, meaning “pause on error” functionality will not work.
I’m not sure the exact reason why, but suspect it’s to do with not having a terminal session attached, along with other missing environment settings.
I’ve even seen issues where interactive debugging doesn’t work outside of containers, like the “-on-error=ask and -debug doesn’t prompt when using WSL” issue I logged for Packer.
Some may suggest the answer is to run these tools locally. Sure, both Packer and Ansible can run locally in your favourite console without issue, but, what if your CI pipeline has several stages that change the environment before Packer and Ansible are used?
You can create scripts to mimick what your CI pipelines stages do, and prepare the environment accordingly, but this will quickly become out-of-date, so just becomes extra maintainance.
I was working on a CI pipeline to build Golden Images, which could take an hour or more between builds. This was painfully slow to develop and troubleshoot, as there were limited build attempts per day.
So, I started investigating methods on interactive debugging within a Kubernetes pipeline. My Google-fu failed me. There was simple nothing out there.
Here is the solution I came up with:
Install a terminal multiplexer (like Screen
) within the build container, which allowed sessions you can attach to:
# part of Dockerfile
# Install dependencies and utils
apt-get update && apt-get install -y Screen
Use Packer’s new error-cleanup-provisioner
to pause the build if an error occurs:
(NOTE: This provisioner will not run unless the normal provisioning run fails)
"error-cleanup-provisioner": {
"type": "shell-local",
"inline": [
"echo 'Running [error-cleanup-provisioner] as an error occurred...'",
"echo 'Sleeping for 2h...'",
"sleep 2h"
]
}
Connect to the build container within Kubernetes:
# find Jenkins pod name
podname=$(kubectl get pod --namespace jenkins -l jenkins=slave -o jsonpath="{.items[0].metadata.name}")
# enter container shell
kubectl exec --namespace jenkins -it "$podname" -- /bin/sh
Attach to the Screen session:
(NOTE: Initially, when you enter the container shell, you won’t see any CI job environment changes)
# show env vars
# note the Jenkinfile job env vars are missing (eg: CI_DEBUG_ENABLED, and PACKER_*)
printenv | sort | grep -E "CI_|PACKER"
# list Screen sessions
screen -ls
# attach detached session
screen -r
# show env vars
# now Jenkins job env vars exist
printenv | sort | grep -E "CI_|PACKER"
Use an interactive debugger, like the Ansible playbook debugger.
# set config
export ANSIBLE_CONFIG="./ansible/ansible.cfg"
# simple ping check
ansible all -m ping --check --user packer -i /tmp/packer-provisioner-*
# run playbook
ansible-playbook ./ansible/playbook-with-error.yml -i /tmp/packer-provisioner-*
Visit my debug-k8s-pipeline repo for the full code examples.
]]>In the previous post I went over an example Azure DevOps Build Pipeline for PowerShell modules. This post will continue from where we left off and discuss the Azure DevOps Release Pipeline for PowerShell modules.
I’ll go over the different stages, and explain how the PowerShell modules are released to multiple internal Artifact feeds.
First, let’s look at the example Azure DevOps Release Pipeline for my PowerShell module. My Azure DevOps project visibility is public for all to see, so you shouldn’t be prompted for a login.
The purpose of this Release Pipeline is to take Artifacts from the Build Pipeline, and release them to a stage. Here’s an example release showing deployments to all three stages (Dev, Test, and Prod).
In the Release section above you can see the PowerShellPipeline Artifacts appear under the Continuous deployment heading. This shows a Release is triggered every time a Build Pipeline creates those Artifacts.
We now move on to the stages. Note there is a line between Artifacts and the Dev stage, due to a Pre-deployment condition trigger set to After release:
This setting ensures the Dev stage is triggered automatically without user intervention.
The Test stage trigger is configured to start after the previous Dev stage, using an After stage trigger:
Lastly, the Prod stage has a Manual only trigger:
This gives us the option to manually validate the Dev and Test environments are working as expected before we release to Prod.
All stages use roughly the same tasks, but let’s take a closer look into Prod:
The Install NuGet task is self-explanatory, and simply installs the specified NuGet binary version. NuGet is required to publish PowerShell modules to our internal Artifact feed.
This task is a placeholder for actual test code, just to highlight you could run integration tests at this point if required. This might include provisioning infrastructure, loading data, then running tests and publishing the test results.
The final task is responsible for running a PowerShell script called Publish-AzDOArtifactFeed.ps1
, which takes
two parameters: AzDOArtifactFeedName
and AzDOPat
:
The Arguments field shown above references Pipeline Variables $(artifact_feed_name)
and $(artifact_feed_pat)
,
shown below:
The code below has comments throughout, but the main steps are:
Once the PowerShell module has been published by the Publish-AzDOArtifactFeed.ps1
script, the new NuGet package
is available within the specified Azure Artifacts feed (eg. prod):